Anyone who says sunshine brings happiness has never danced in the rain.
~ Anonymous
More weekend sewing! Of course, the fact that it was a 3-day weekend (Columbus Day) didn't hurt... ;)
I decided to start sewing the rain coat. It is my first time working with this type of material (laminate? oil cloth? not sure...) so I was feeling a bit of trepidation.
(Ha! Word-of-the-Day double points!!)
I picked up a package of Microtex sharp needles to use and figured that I wouldn't be relying heavily on my iron - but beyond that I wasn't sure what other special steps or precautions to take...
According to the instructions, holes don't close up well in this type of fabric, and so they suggested that I minimize my use of pins and pin only within the seam allowances. I've got to say that this seems like a bit of a rock/hard-place situation: Sewing requires putting pins and needles through fabric. Raincoats - the garment you LEAST want to have holes in the fabric - is made of the one fabric that doesn't self-heal when you poke holes in it... Really? We couldn't have come up with a better system than this?
Anyways, as if this stress wasn't enough, the directions had me starting with the hood - which basically has princess seams! Because we all know how easily oil cloth/laminate stretches around a curve! ;)
This was one time when (in addition to making sure that the longer piece was against the feed dogs) I did clip the straighter piece BEFORE stitching in order to make it fit on the curvier piece.
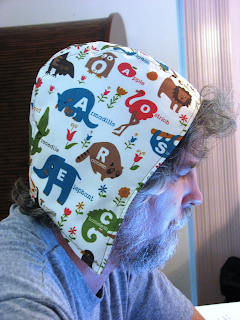
Despite my anxiety, it did come together and I was able to produce this hood:
Yes, my husband is modeling a hood that supposedly goes with a 3T-sized raincoat...
Let's just hope my friend's son has a big head! ;)
The first steps also had me lining the hood - why do I always have so much trouble with this type of thing? It was really hard to get the lining to fit smoothly inside the hood...
Oh, one more thing about the hood - there is no drawstring or other way to tighten it up... I hope that doesn't turn out to be a problem.
Next up were a lot of straight seams, so I picked up some speed. :)
I was able to get much of the outer shell assembled - both the front and back have yokes and the front has wide center panels that completely overlap:
Here's a close-up - you can see the yokes and the top stitching and the overlapping front panels (placards?) and the leather loops and "toggle" buttons...
The pockets are interesting in 2 ways. First, while they are lined, the lining doesn't extend all the way to the top - there is an inch or so of the oil cloth/laminate folded over to the inside before the lining starts. I'm guessing this is some kind of raincoat thing...
And I'm guessing that it will show up again because the raincoat has both a lining and an oil cloth/laminate facing - I'm curious to see how those pieces will go together.
The second interesting thing is that they are not placed fully on the front of the raincoat, but rather they cross over the side seams and extend about an inch into the back of the raincoat.
Next steps will be dealing with the sleeves and then getting the facings, lining and hood all assembled with the body of the raincoat. Maybe one more weekend? Fingers crossed! :)


No comments:
Post a Comment