We make a living by what we get,
but we make a life by what we give.
~ Winston Churchill
Okay, this project - my last Christmas gift project - got off to a rocky start.
ETA: Thanks to Lisa for pointing out that I forgot to say what it is! It's an insulated casserole tote - for a round casserole dish. :)
First I found myself slightly annoyed by the fact that the instructions called for me to cut a 17 inch diameter circle and did not provide a pattern piece. It's easy to cut rectangles of any dimensions, but circles are a bit more complicated.
In the end, I made my own compass by cutting a ribbon 8.5 inches long (1/2 of 17) and pinning one end to my tracing paper and then slowly spinning it around, marking the end of the ribbon with a pen:
That worked amazingly well. :)
But then, issue #2 raised it's ugly head. Not enough fabric:
I had purchased one yard, but apparently - between the fabric being on the narrow side and my ripping off a strip on each end to make sure that I was working on the grain line - I didn't have enough fabric left to get 4 copies of this circle and the handles...
And there wasn't really time to re-order more fabric...
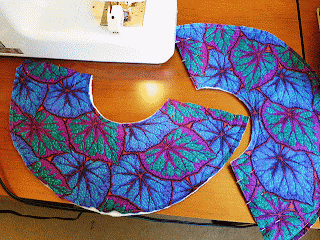
So, I cut 2 circles out of the fabric (for the outside of the casserole tote) and then scrounged around in my stash and found some medium weight canvas and cut 2 more circles for the inside of the tote. Hopefully that will be okay - the inside generally won't show...
The one thing I had PLENTY of is the insulation - I have yards of that stuff left over from last year's Christmas presents! ;)
Once the pieces were cut (top & bottom, two handles), I basted 4 "sandwiches" with the insulated batting in the middle of each:
The circle fun wasn't over - it turns out the next step was to cut a circle out of the middle of one of my big circles. I decided the easiest way to make sure that it was centered was to cut it out of the original circle pattern.
And then I folded the fabric in half for the actual cutting - it actually worked pretty well. :)
After basting around that inner circle, the instructions had me cut the circle in half:
Next was the start of a bias tape binding jamboree! ;)
If you aren't a fan of applying bias tape, I'd avoid this project. On the other hand, it gave me lots of good practice trying to get everything lined up so that I could stitch-in-the-ditch for the final attachment seam.
Wide double-fold bias tape was used to cover the sides of the 2 handles and the straight edges of the circle pieces:
Extra wide (quilt binding) bias tape was used to bind the inner curve of the two top pieces. This curve is pretty narrow and I had a hard time getting the bias tape to lie smoothly around it. In fact, I had to rip stitches on the first half, so I hand basted the bias tape on the second half before using my machine. That helped. :)
Finally, the two pieces (top and bottom) are ready to go together!
The extra wide bias tape around the inner circle is used as a channel for a cord that can be relaxed or tightened.
And, finally, the last of my Christmas gifts is done! :)
I am going to take a day or so for a breather, and then try to get myself mentally organized with sewing plans in 2013. I hope it's a wonderful sewing year for all of us! :)


It's pretty, but what is it?
ReplyDeleteOh my goodness! Ooops! ;)
DeleteIt's an insulated casserole tote - I had better go add that information to my post!
Thanks, Lisa! (face red)
Your solution to not enough fabric worked perfectly. Good job!
ReplyDeleteThanks, Gwen! :)
DeleteSometimes I think I save too many "scraps" from my sewing projects, but it makes me so happy when I can use those scraps to save a new project! ;)
It looks good, but I don't have any bias tape jamborees planned for my future. Just sayin' ...
ReplyDeleteWell, okay Mary, but if you are skipping the jamboree then no tambourine or maracas for you... ;)
DeleteYou have more patience than me. I hate applying bias tape! Maybe if I did it more....nope, can't make me, not gonna do it!
ReplyDeleteThey look great. I see no reason that the inside needs to match the outside.
Thanks, Debbie! I really didn't mind all the straight seams, because I want to be better at it and found the practice helpful - but those curves - yuck!
Delete