Wednesday, January 9, 2013

An Intervention: The Plan

It's an addiction.  I love clothes.  [...]  I have lots of costumes.  You never know when you're going to have to dress up like a milkmaid from the 1600s.  
~ Zooey Deschanel


I never dreamed it would get this bad, but I finally faced the truth and realized that it had to be done.  I have arranged an intervention for… myself.  I singled out one of my friends who, in my opinion, always looks classy and “put together” and asked her to play Stacy and Clinton (Stacon?  Clintacy?) from “What Not to Wear” with me. 

My wardrobe is hopeless – I have a closet full of clothes, but I never have anything to wear.  Nothing goes together and even if it did, I wouldn’t know how to combine things.  I end up wearing the same old handful of standbys all the time and, while I will grant you that I’m usually easy to spot in a crowd (!), I don’t think anyone would ever say that I look “put together”. 

So, I asked my friend, W., if she would take me on a shopping trip and help me start from the ground up to assemble a good, solid wardrobe and learn how to dress myself.  Once she realized that I wasn’t expecting her to provide the credit card pre-loaded with $5,000, she was happy and excited to sign on.  (Poor W. – I don’t think she knew what she was getting into – the money is likely to be the least of the difficulties!) 

We each did our homework ahead of time.  W. picked out the stores that she wanted to include in our shopping extravaganza and I looked up and aggregated a bunch of different lists of “basic wardrobe staples” from the internet.  (A good one is at Real Simple.)  

Oddly enough, when I showed her my initial list of over 50 items (just the basics, folks, nothing but the basics), it was not received with overwhelming approval and satisfaction.  Apparently she wanted me to “prioritize” or some such nonsense…  She didn’t even give me credit for the fact that I had already weeded out the velvet jacket!  ;)

What!?!?  We can’t purchase a basic wardrobe of about 50 items in a single shopping day?  Humph…. 

After a painful and brutally ruthless editing session, (cue triumphant Rocky theme song), I was able to get it down to about 30 items.  Yay! 

Here, then, is my prioritized list:

Top Priority
  1. At least 1 camisole in a neutral, skin-tone shade
  2. Tank tops – 1-4, at least 1 in black
  3. Short-sleeve t-shirt – at least 1 white & 1 black, possibly a couple more in other solid colors
  4. Long-sleeve t-shirt – 1 white & 1 black
  5. Pinstriped oxford shirts (2)
  6. Silk shells (at least 2)
  7. Cardigans – possibly 1 in black and 1 in white
  8. Fitted jacket/blazer
  9. Skirts for work – possibly 3 – maybe 1 solid/neutral and 2 patterned
  10. Blue jeans (2-4 pairs)
  11. Work slacks - 3-5 pairs, to include khakis, grey & tweed
  12. Solid color shirtdress
  13. Printed dress
  14. Belts – at least 2
  15. Flats – at least 2 pairs

Second Tier
  1. Graphic sweater
  2. Short sleeved white blouse
  3. Bold blouse
  4. Ruffled shirt
  5. Denim jacket
  6. A-line, wool skirt
  7. Little black dress
  8. Black suit – I own one suit and there are not many times in my job when a suit is necessary
  9. Summer suit – ditto
  10. Black pants – I already have a pair, but 2 isn’t bad
  11. White button up shirt – I already have one, but 2 isn’t bad

Pass
  1. Polo shirts (1-3) – meh…
  2. Black turtleneck – I live in Florida – there are enough warm tops on my list already
  3. V-neck sweater – ditto
  4. Patterned jacket - ditto
  5. Sparkly top – I’m not a night-life kind of a gal
  6. Cocktail skirt – ditto
  7. Party dress – ditto
  8. Sun dress – I can make these, plus, it’s January!
Besides the obvious (i.e., insane), what do you think about “my” (internet-plagiarized) shopping list?  Luckily, W. is a frugal shopper, so I’m counting on her to help steer me towards the bargains.  Although, I do believe that you get what you pay for, so I don’t want things to be too cheap. 

I have no idea how much progress we’ll be able to make in one day, but this will be the first time in my life that I’ve ever shopped with a wardrobe plan – so wish me luck!  :)

And stay tuned, to see how it all turns out…  ;)

Tuesday, January 8, 2013

Gratuitous Kitten Picture

Which is more beautiful - feline movement or feline stillness?
~ Elizabeth Hamilton


Monday, January 7, 2013

Santa's Post-Christmas Sewing Sweat Shop: Day Five

We make a living by what we get,
but we make a life by what we give.
~ Winston Churchill

Okay, this project - my last Christmas gift project - got off to a rocky start.  

ETA: Thanks to Lisa for pointing out that I forgot to say what it is!  It's an insulated casserole tote - for a round casserole dish.  :)

First I found myself slightly annoyed by the fact that the instructions called for me to cut a 17 inch diameter circle and did not provide a pattern piece.  It's easy to cut rectangles of any dimensions, but circles are a bit more complicated.

In the end, I made my own compass by cutting a ribbon 8.5 inches long (1/2 of 17) and pinning one end to my tracing paper and then slowly spinning it around, marking the end of the ribbon with a pen:  


That worked amazingly well.  :)

But then, issue #2 raised it's ugly head.  Not enough fabric:  


I had purchased one yard, but apparently - between the fabric being on the narrow side and my ripping off a strip on each end to make sure that I was working on the grain line - I didn't have enough fabric left to get 4 copies of this circle and the handles...  

And there wasn't really time to re-order more fabric...  

So, I cut 2 circles out of the fabric (for the outside of the casserole tote) and then scrounged around in my stash and found some medium weight canvas and cut 2 more circles for the inside of the tote.  Hopefully that will be okay - the inside generally won't show...  


The one thing I had PLENTY of is the insulation - I have yards of that stuff left over from last year's Christmas presents!  ;)

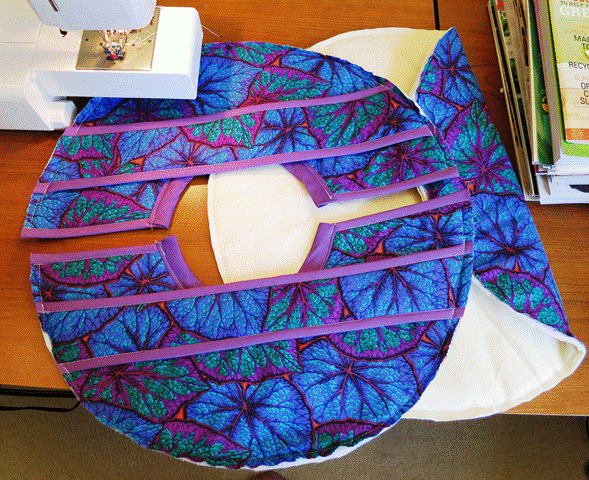
Once the pieces were cut (top & bottom, two handles), I basted 4 "sandwiches" with the insulated batting in the middle of each:  


The circle fun wasn't over - it turns out the next step was to cut a circle out of the middle of one of my big circles.  I decided the easiest way to make sure that it was centered was to cut it out of the original circle pattern.  


And then I folded the fabric in half for the actual cutting - it actually worked pretty well.  :)


After basting around that inner circle, the instructions had me cut the circle in half:  


Next was the start of a bias tape binding jamboree!  ;)

If you aren't a fan of applying bias tape, I'd avoid this project.  On the other hand, it gave me lots of good practice trying to get everything lined up so that I could stitch-in-the-ditch for the final attachment seam.  

Wide double-fold bias tape was used to cover the sides of the 2 handles and the straight edges of the circle pieces:  


Extra wide (quilt binding) bias tape was used to bind the inner curve of the two top pieces.  This curve is pretty narrow and I had a hard time getting the bias tape to lie smoothly around it.  In fact, I had to rip stitches on the first half, so I hand basted the bias tape on the second half before using my machine.  That helped.  :)


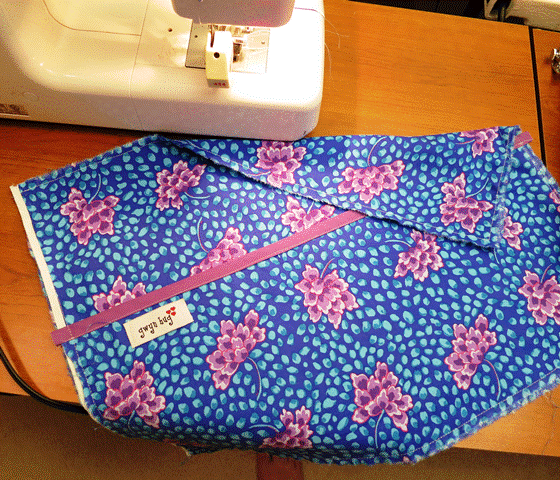
Finally, the two pieces (top and bottom) are ready to go together!  


The extra wide bias tape around the inner circle is used as a channel for a cord that can be relaxed or tightened.  


And, finally, the last of my Christmas gifts is done!  :)


I am going to take a day or so for a breather, and then try to get myself mentally organized with sewing plans in 2013.  I hope it's a wonderful sewing year for all of us!  :)

Friday, January 4, 2013

Santa's Post-Christmas Sewing Sweat Shop: Day Four

It took me years and years of trial efforts to work out that there is absolutely no knitting triumph I can achieve that my husband will think is worth being woken up for.

Only 2 Christmas gifts left to go!  Today I focused on the laptop sleeve - the dimensions depend, obviously, on the size of the laptop.  That means that I had to pester my friend to measure her laptop for me...  

And without looking at the instructions, I assumed it was length and width that I needed, but the instructions actually wanted a circumference, so after she measured it once, I had to send her back to measure it again!  :(

Anyways, eventually we got the numbers sorted out and it was time to begin the cutting and sewing.  

Step 1: Find a cat to help you cut the batting to size...  


(Note that the book doesn't explicitly call out this step, but Oliver felt it was implied...)  

The next step is to make the flap - which does not have batting inside.  


But it does have hook & loop tape on one side.  Note that I remembered to add the tape BEFORE stitching the 2 pieces together, so the stitching doesn't show on the other side.  Yay!  :)


Next I got to practice my "mad" quilting skills on the body of the sleeve.  (Mad...  bad...  It's a thin line...)  ;)

As before, I started with a large X that connects the corners, but because the sleeve is so large, I divided each edge into thirds (instead of in half) and stitched 2 parallelograms on the face.  


After adding the other half of the hook and loop tape to the sleeve and my label to the flap, it was time to fold the sleeve fabric in half (right sides together) and stitch the side and bottom seams.  


The instructions suggest covering the 2 inner seams with bias tape - I thought that was a nice touch.  


Although I'm not sure how I was supposed to handle the double-bound corner and whatever I did wasn't right - so that one bottom corner is a bit rounded, instead of a sharp point.  :(


From here, I was just a hop, skip and a jump from being done.  :)

Attach the flap...  


... and add bias tape to finish the top edge.  Ta da!  


One very cute laptop sleeve!  Shall I go wake up my husband to show him?  ;)

Thursday, January 3, 2013

Santa's Post-Christmas Sewing Sweat Shop: Day Three

What I make with my hands, I give of my heart.
~ Unknown

Two of my friends / co-workers requested the bed pocket - it hangs from the side of the bed and has pockets to hold books, magazines, a T.V. remote, etc.  

The bed organizers only have 4 pieces - 2 main pieces and 2 pocket pieces:  


Interesting, the instructions never have you sew anything right-sides together.  The first step was to add binding along the top of the 2 pocket pieces (wrong sides together):  


Next, I added my label and then basted the 2 pocket pieces to the 2 main pieces - wrong sides together again:  


You can divide the single big pocket into any number of smaller pockets of the dimensions of your choice.  I just divided the pocket into 2 parts - one narrow for things like a remote control, phone or glasses and one wide for books & magazines:  


Oops - I forgot to take that shot with the blue fabric, so you can see the fabric chosen by my other friend / co-worker.  ;)

You can use a drinking glass to create the rounded the corners along the bottom edge - but this was a great opportunity to use one of the plastic shapes that I got recently.  Also, see my black chalk liner?  I LOVE that thing!  :)


The next step was to add bias binding along the sides and bottom:


I found the instructions for adding the piece of rubber a bit confusing, but some internet "research" helped.  It is added along the top of the organizer, with maybe 1/2 - 3/4 inch overlap.  


Finally, that top edge gets covered up by bias binding.  A walking foot was recommended but I have trouble doing close edge stitching with a walking foot, and so I used my regular foot and it handled the multiple layers just fine:  


Here I "model" one of the organizers on our sofa - you can see how the rubber sheet goes under the cushion:  


And with the cushion in place:  


That's 7 out of 9 Christmas gifts done!  Yay!  :)

If you are thinking that I'm running a bit late, remember that one year I wove their gifts on my floor loom and didn't finish until the end of May - so, the bar has been set pretty low!  ;)

Wednesday, January 2, 2013

Santa's Post-Christmas Sewing Sweat Shop: Day Two

To quilt is human, to finish divine.
~ Unknown

I am making progress and things are being finished!  :)

First up, all four of the "Not-Ugly Car Trash Bags" are complete:


Next up was one set of 4 place mats.  The pattern created 4 place mats, plus napkin and silverware holders, out of just 1 yard of fabric.  I had purchased 1.5 yards, thinking that I'd make some matching napkins - but when I saw how small the place mats were going to be, I decided to use all 1.5 yards to make full size place mats and use a second fabric for the attached napkin & silverware holders.  

The pattern also makes the place mats out of 2 layers of cotton fabric - that seemed pretty flimsy to me, so I decided to add a layer of craft batting inside.

I placed the 2 layers of fabric right-sides-together on top of the batting and sewed around all 4 sides, leaving a 4 inch opening to turn it right-side out.


before turning right-side out I trimmed the batting close to the line of stitching


here it is turned right-side out


The next step in the official instructions is to top stitch around the edges, but because I added the batting, I figured I should quilt it and I wanted to start from the middle and work my way out to the edges - so I started with a big "X" connecting the 4 corners:  


I don't know if this is generally accepted wisdom or not, but based on my limited personal experience, if I start on the outside edge of a piece, the top layer of fabric is pushed and pushed and pushed until I get a large, ugly bubble on the other end.  Working from the inside towards the outside seems to distribute the fabric more evenly, so that, at worst, I get multiple small bubbles, instead of one big one.  I also used a walking foot to try to minimize any fabric "pile-up."  


Next I added a diamond connecting the middles of each edge:


Finally I top-stitched around the edges and added the pockets to hold the napkins and silverware.


Kind of cute, huh?  I definitely think the larger size is better.  Fingers crossed that my friend is okay with the second fabric that I added for the silverware and napkin holder - I did that all on my own...  Yikes!  ;)

Tuesday, January 1, 2013

Happy New Year Wishes and Kittens


“I hope that in this year to come, you make mistakes.


Because if you are making mistakes, then you are making new things, trying new things, learning, living, pushing yourself, changing yourself, changing your world. You're doing things you've never done before, and more importantly, you're Doing Something.

So that's my wish for you, and all of us, and my wish for myself. Make New Mistakes. Make glorious, amazing mistakes. Make mistakes nobody's ever made before. Don't freeze, don't stop, don't worry that it isn't good enough, or it isn't perfect, whatever it is: art, or love, or work or family or life.

Whatever it is you're scared of doing, Do it.

Make your mistakes, next year and forever.” 


~Neil Gaiman


This rare moment of peaceful togetherness brought to you by the year 2013.  
(Possibly the only such moment we'll see this year...)
Wishing you and yours a very Happy New Year!